Index

Tuesday, November 30, 2010

Roast of Venison


Do you have a hunter in the family? Venison is lean and healthy with a fine grain. But because of its leanness, it requires special cooking. This particular recipe requires some forethought since it is 4-5 day operation.

For the life of me, I do not remember where I got this recipe. The first time I made it, I lived in Michigan and my friend, Rick, a hunter, was my easy access to fresh venison.

The first time I made it was for Christmas. My mother wasn't too happy, but it wasn't the main meat or star of the show. It was something "different and fun" which is what holidays should be all about. If people had not known it was venison, they would have thought it a nice cut of beef. My Dad loved it.

Do not omit the sauce. 

Marinade:
  • 3-4 lb. boneless venison roast, trimmed of fat
  • 1 cup dry red wine
  • 1 cup water
  • 3 garlic cloves, crushed

Slow Cooker Ingredients:
  • 6 medium carrots, cut in 1-inch pieces
  • 2 celery stalks, cut in 1-inch pieces
  • 1 medium onion, coarsely chopped
  • 1/2 teaspoon dried rosemary, crushed
  • 1 teaspoon ground cumin
  • 2 bay leaves
Sauce:
  • 1 tablespoon fresh lemon juice (do not omit)
  • 1 teaspoon Worcestershire sauce
  • 1/2 teaspoon salt
  • 1/4 teaspoon freshly-ground pepper
  • 2 tablespoons cornstarch
  • 1/4 cup water


Put the venison, wine, water and garlic into a large zip lock plastic bag. Squeeze out air and close securely. Place on a shallow plate and refrigerate for 4 days, turning every once-in-a-while.

Drain marinade into a slow cooker. Preheat the broiler and brown the roast on all sides for about 20-30 minutes. Transfer to slow cooker and add carrots, celery, onion, rosemary, cumin and bay leaves. Cook on low for 10 hours or until roast is fork tender.

Remove roast and keep in warm preheated oven--150 F. degrees. 

Transfer liquid from slow cooker to a saucepan and add the lemon juice, Worcestershire sauce, salt and pepper. Bring to a boil. Remove bay leaves.

In a small bowl or jar, mix water and cornstarch. Add to saucepan and cook until mixture thickens.

Slice meat and serve with generous amounts of sauce.


Tuesday, November 23, 2010

4-Hour Roast Chicken


I'm not the biggest fan of turkey, unless maybe it's deep fried. And if I make a chicken, this is now the only way I do it. It has never failed me. The birds come out juicy and tender with a crisp crust and it makes its own gravy, so be sure to have a bowl of mashed potatoes ready. The spices are great. Sure, you could just purchase a rotisserie chicken from the store, but it won't be half as good. And take it from someone who worked in a deli--do you really know how long those birds were sitting in the cooler before they roasted them.......?


  • 1 chicken, about 4 lbs.
  • 1 teaspoon paprika
  • 1/2 teaspoon onion powder
  • 1/2 teaspoon dried thyme flakes
  • 1/2 teaspoon white pepper
  • 1/4 teaspoon cayenne pepper
  • 1/4 teaspoon black pepper
  • 1/4 teaspoon garlic powder
  • 1/4 - 1/2 teaspoon dried rosemary
  • 1 medium onion cut into fourths or large chunks
  • Equipment: Heavy Dutch Oven

In a small bowl, mix spices except for rosemary. Set aside the cut-up onion. Rinse chicken inside and out. Pat dry. Rub chicken inside and out with spice mixture. Place onion pieces in cavity and sprinkle the outside of the bird with dried rosemary. Place chicken in re-sealable plastic. Refrigerate overnight.


Preheat oven to 250 F degrees. Place chicken in heavy dutch oven. I use a cast-iron enamel-lined oval Dutch oven. Pin cavity closed. Tie legs together (optional).

Bake, uncovered, for four hours or until bird reaches minimum temperature of 175 degrees, basting once-in-a-while during last 40 minutes or so. Let rest for 10 minutes before carving. Strain juices to serve as gravy.


Notes:  So, if you have a 3 lb. bird, figure roasting for about 3 hours. Because you're cooking at a lower temperature, I think it very important to take the temp. of the bird before removing from oven. BUT, because you are roasting at a lower temp., your bird won't dry out (did I just really say that?).

Saturday, November 20, 2010

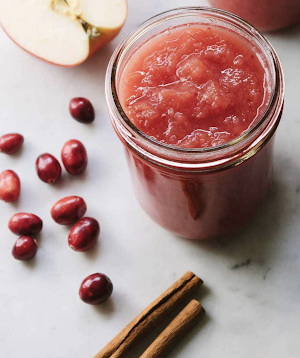
Applesauce with Cranberries and Crystallized Ginger


Homemade applesauce is quite simple. It's a great condiment to adorn any holiday table and goes well with turkey and ham and all things mashed potatoes and stuffing. The simple addition of fresh cranberries and minced ginger spice up this festive recipe for a festive holiday presentation. Try to use a variety of apples and always include one Yellow Delicious. Look for ginger sold in larger packages, not the small ridiculously-priced spice jars.

  • 4 apples (about 2 lbs.) peeled, cored and chopped
  • 1 cup fresh cranberries, picked over
  • 1/2  - 1 cup sugar (white or a combination of light brown)
  • 1/4 cup apple juice or water, but not more
  • 3-inch cinnamon stick
  • 3-inch strip of lemon zest removed with vegetable peeler
  • 1 tablespoon well-chopped, crystallized ginger
  • 1/16 teaspoon vanilla
  • 2 tablespoons unsalted butter (optional, but good if serving warm or with pancakes)

In a heavy saucepan, cook the apples, cranberries, sugar, apple juice or water, cinnamon stick, lemon and ginger over moderate heat, stirring until apples are soft, 15-25 minutes. Cranberries will have "popped" turning mixture pink.

Remove from heat and discard lemon zest and cinnamon stick. Place in food processor and pulse until smooth. Taste. Add butter and vanilla. Taste and add more sugar if necessary. Place in bowl and, if desired, sprinkle with cinnamon. Serve warm or cold. Refrigerate leftovers.


Wednesday, November 17, 2010

Mashed Potatoes


Mashed potatoes should have a bit of "structure" to them.
They should be "mashed" and not whipped or soupy.

Mashed potatoes don't have be boring and are easily flavored with a bit of dried onion and fresh garlic. I do not like “whipped” potatoes and will save that glop for my death-bed meal along with jarred applesauce that I sip through a straw.

  • 2 large Idaho potatoes, about 2 lbs.
  • 1-2 teaspoons dried onion flakes
  • 1 small garlic clove, peeled and sliced
  • 1/2 - 3/4 cup milk or Half-and-Half or cream or any combo at room temperature or slightly nuked
  • 6 T. Butter
  • Salt and pepper

(Easily serves 4)
Peel potatoes. I no longer cut into "chunks" or fourths because they cook unevenly. Slice into 3/4-inch rounds, that way they are all uniform and cook evenly and faster.

Place in a medium pan of water and drain and then rinse. Fill pan with enough water to cover the potatoes by about an inch of water. Add the dried onion flakes and a few slices of the garlic clove depending on taste. A little goes a long way. Cover, bring to a boil and then lower heat a bit. Cook for about 10-15 minutes or until a fork easily pierces them. Remove from heat, reduce burner to low.

Using the pan lid to hold the potatoes in, drain in a sink. Don’t worry if some of the dried onion and garlic escape; the potatoes have already absorbed their flavor. 

Place the pan back on the range to allow any water/moisture to dry up. Using a fork stir potatoes around a bit to begin breaking up.

You have several options to "mash" your potatoes. A ricer is the best. If you don't have that, use a simple potato masher. If you don't have that, use a pastry blender or wire whisk. I now usually use a wire pastry blender. Electric beaters can cause potatoes be become "gluey."

A pastry blender is a great way to mash potatoes!
Remove pan from heat. Add butter—several tablespoons, and begin mashing. Add warm milk or cream—a little at a time, whisking/mashing as you go, until you get a desired “mash" and thickness. 

Potatoes take a lot of salt, so use a good one, such as Kosher salt or a nice sea salt. Add freshly-ground pepper and even more butter. If desired, add some chopped, fresh parsley or chopped green onions.


Green onions take mashed potatoes to a higher level.


If you are not going to serve them at once, place in a buttered casserole dish. Dot with butter. Cover. To re-heat, place in a 350 degree oven until heated through and butter is melted.

Dive in!!!


Tuesday, November 16, 2010

Dutch Baby (Puffed Pancake)


A light, puffed pancake using the simplest of ingredients... and it's pretty easy to make, too! A great recipe to involve kids!

I'm always amazed when I make this recipe: amazed at the simple, inexpensive ingredients; amazed at how it puffs up like a space galaxy or emerging nebula; amazed at how "French" and professional it looks when done; and then amazed at how good it actually tastes.

Just be sure to have eggs and milk at room temperature. You can nuke the milk just a bit to get it there and put the whole eggs in their shells in some warm water for 5-10 minutes.

I prefer the classic lemon-and-powdered sugar garnish--lots of powdered sugar. But I've also had it with stewed apples (and powdered sugar). It's also great with fresh berries served in the center and drizzled with honey or maple syrup.

This makes for a great Sunday breakfast or a light, evening meal. And, like I said, involve children. They will be thrilled to watch it puff like magic.


  • 2 eggs, at room temperature
  • 1/2 cup all purpose flour
  • 1/2 cup milk, at room temperature
  • Pinch of nutmeg
  • 1/4 teaspoon vanilla
  • 4 tablespoons butter
  • Confectioners' sugar
  • Juice of fresh lemon
  • Cast Iron Skillet, 10 or 12 inch


Preheat oven to 450 degrees.

In a mixing bowl, lightly beat the eggs. And the flour, milk, nutmeg, vanilla and lightly beat until blended but still slightly lumpy. I use an old-fashioned egg beater. A whisk works well, too.

An enamel-lined cast-iron skillet like this works well.
Place butter in skillet and put in oven. When butter is melted, pour in the batter and return to oven. Bake until pancake is billowing on the edges and golden brown, about 15 minutes.

Note the raised, brown edges. No two pancakes will ever look the same!


Remove from pan and plate. The pancake will fall, so don't be alarmed. Squeeze on lemon juice and dust with powdered sugar. I say "dust" to be polite. Pile it on in drifts like a Midwestern blizzard!


Notes: If you don't have an iron skillet, you may sub a cake pan or pie dish, just alter the batter according to size. If you use a regular skillet, make sure the handle is heat-proof. If you don't have nutmeg, omit--or add a sprinkle of cinnamon. I've also used apple pie spice.


Tuesday, November 9, 2010

No-Cook, Fresh, Cranberry Relish Everyone Will Like


Even people who don't like cranberry relish gobble this up. At its best, it should be prepared a week or so ahead so the sugar "cooks" the relish. It lasts forever in the refrigerator and becomes better with age. I am just now finishing up the last bit I made from last winter. For whatever reason, fresh cranberries disappear from produce shelves way too early. So, plan ahead. Make triple recipes.


Please note: this is a relish. Not a sauce or a "jellied"sauce. To be honest, it is really a kind of "jam." When I first started to blog, it was my #1 recipe. Like I said, make a large batch. It isn't just for Thanksgiving.

I really owe the success of this recipe to being raised a Catholic. I attended Catholic school for 12 years. When I was in the seventh grade, we moved to a much smaller town than the one in which I was raised. My school shrunk into a four-room, two-story brick building constructed in 1900. It was considered "modern" for its time and housed a bell tower complete with attic. I loved that old school. Sadly, it was demolished to make room for an even more "modern" one. No comparison.

One Saturday in autumn, on my Schwin bicycle, I delivered several paper bags of  natural peat moss from a rotting log I had discovered in the woods to the convent to improve the soil for planting spring bulbs. Mind you, the "convent" was an old house. Vintage. The school was on one side. The convent, rectory and church were on the other. In between was a large, historic cemetery. For a kid, it was all pretty cool.

The back door was off of a porch/pantry. The doorbell was very old-fashioned. It was a real bell you turned or twisted from the outside.  I could hear laughter inside, but no one answered. After several turns of the bell (it was fun), finally, Sister Jerome showed up. She was the "principal" of the school. Wearing an apron I had never seen on any nun, she was all smiles and jovial. She explained she and the rest of the Sisters were attempting to make cranberry relish. When they put the berries in the mill to grind, they squirted all over them. Hence, the laughter. 

In a way, I felt kind of special to be included.  Great. Sister Jerome inspected what I had called "peat moss" and had me sprinkle it over the borders. It was a love/hate relationship with that nun. But, looking back, I think she was the one who had a love/hate relationship with herself. My understanding is that she left the convent. Probably. She was too gifted to be confined by a manual doorbell. And to be named after a male.

So, flash forward ... The first time I attempted to make cranberry relish was when I myself was a young teacher. I thought it would be easy and fun like the Sisters at my school. 

Wrong!

It was so horrible and bitter I dared not bring it home for Thanksgiving. But, I hated to throw it away since it took so much work to chop chop chop ... so I kept it in the fridge and just kind of added more sugar, day by day, tasting after each addition. Then, one day, a miracle happened. The heavens opened! It was ideal and just kind of turned into a lovely "jam." It was absolutely delicious without any bitterness. Hallelujah! Long story short,  I brought it home for Christmas and it was an instant hit and has become a family favorite and staple at our holiday table.

One holiday when I wasn't home for the holidays, I had to actually send a quart by express mail! 

I dare you not to make this. I double dare you not to make this. I triple dare you not to make this. Just do it. Heaven wants to shine on you and your family and your feast. Cmon. You can do it. Really. It's too easy not to ... 

  • 1 bag fresh cranberries
  • 1-2 oranges
  • White sugar. And lots of it. About 4 cups

Carefully go over cranberries and remove old shriveled ones. Cut one orange into smaller sections (including the peel) and remove seeds if necessary. Place some berries and orange sections in food processor or mini prep and pulse/grind. Remember, this is a relish, so don't over grind into a puree. Remove to large bowl. Sometimes I add a bit more juice from another orange if mixture seems too dry. If the orange is bland, I sometimes add a bit more zest from the second orange. Add 1-2 cups of sugar. Cover and place in refrigerator.

For the next several days, add 1/2 cup sugar at a time and stir. In total, you will probably use about 2 pounds of sugar or 4 cups. By the fifth day or so the flavors will really begin to blend and you should be able to just taste a bit of orange. After about a week, it will have "jellied" and you are in cranberry Nirvana.

This is the perfect side to anything savory or bland. Of course, it's wonderful with stuffing. I love it with kreplach. Put in small jars, it makes for a much-appreciated gift.


Notes: Last year I just dumped all the sugar into a bowl with the processed berries and oranges and then stirred at least once a day for a week or so.  It was just fine! The thrill of dumping in a 4 pound bag of sugar is worth it! When allowed to sit, the sugar mingles and mellows the tart berries and orange peel. If made and served too soon, it will be way too sweet.