Index

Sunday, March 20, 2011

Pot Roast. Easy and All-American.


Pot roast. It's what's for dinner tonight! I love to serve it
with rye bread to soak up the wonderful gravy.

This is one of many ways to fix a chuck roast. My grocer had them on sale so I grabbed one remembering the good ole days when the sale price was the regular price.

Chuck roasts lend themselves to a long, slow braising time to break down the meat into tender, fall-apart, melt-in-your-mouth tenderness. Chances are, you have most of the ingredients on hand, a can of mushroom soup, a package of dry onion soup, a bit of sour cream and some canned mushrooms. Add sides of steamed carrots and mashed potatoes or noodles and you have an all-American meal!

My roast was small, around 2.75 lbs., (easily serves 2-3 people) so I used only about 3/4 can of mushroom soup and 1/2 package of the dry onion soup (empty the entire contents of one envelope into a bowl or plate. Mix the powder and the dry onions together and then use half.)

  • 1, 2-5 lb. chuck roast
  • 1 can cream of mushroom soup
  • 1 envelope dry onion soup mix (I used half for a roast this size)
  • Optional: 1 small can mushroom pieces, drained, saving the liquid or several fresh mushrooms, sliced
  • 1/2 cup liquid. This may be 1/4 cup beef stock mixed with 1/4 cup water, or all water or chicken stock, or the mushroom liquid mixed with beef stock or chicken stock. It will be richer if part beef stock is used.
  • 3-4 fresh thyme stems or about 1/4-1/2 teaspoon dried thyme
  • 1 clove garlic, thinly sliced
  • (Optional) 1/2 cup sour cream mixed with 1-2 tablespoons flour
  • (Optional) 3-4 drops Worcestershire

Wipe the chuck roast with a damp paper towel. Coat on all sides with dry onion soup mix.
If desired, pepper it (the soup mix has plenty of salt already). Place in a deep Dutch oven.
If using dried thyme, sprinkle on top along with mushroom pieces. Pour in liquid around the roast and place garlic slices around it in the liquid. Spoon dollops of cream of mushroom soup on top. If using fresh thyme, place sprigs on top. Cover. 


Place on top of stove and bring to a slow boil. Reduce to simmer and slow simmer for 3 hours, turning once or twice, or until meat is tender and beginning to fall apart OR place in a slow oven, around 250-300 for the same amount of time. (If it's warm outside, I settle for the range option. If it's cold out, I put on the oven.) I usually flip it half-way through.

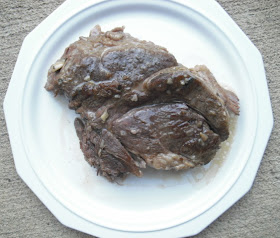
When it's done, it will have made a lovely gravy in addition to filling your living space with a rich aroma.

Notice the fat that has risen to the top.

Remove the roast to a plate and tent with tin foil. Remove fat from gravy. I use the paper-towel method. Simply take a piece of paper towel and place on top of gravy. It will soak the grease. Using a side-sweeping motion, remove and throw away. Repeat until most of the fat is gone.


In the lower left, you can see the meat just beginning to fall apart.

Bring gravy to a simmer and add the sour cream that has been mixed with the flour. Whisk until smooth. Add just a few drops of Worcestershire. Taste. Gravy won't be thick but a creamy consistency.

Make the gravy as rich or as thick as you'd like.

You may also thicken the gravy with Wondra Flour, which I've also done. Or mix flour into butter (two parts flour to one part butter) and then add.

Notes: Don't throw out any leftover gravy. It's great served over noodles/pasta. I used to make this in the crock pot and if you work and are pressed for time, that's the way to go. But sometimes it's overcooked and simply shreds apart (but it's still good!!!!).


Tuesday, March 15, 2011

Irish Soda Bread with Dried Fruit and Caraway


A true Irish soda bread uses whole-grained flours, not white, and little, if any, sugar (it's actually quite bland). Instead of yeast, which was not readily available to then-poor agrarian farmers, baking soda was used. When combined with acidic buttermilk, the chemical reaction caused the bread to rise. Just be sure your baking soda is fresh.

In Britain, the addition of eggs and some sort of fat would constitute a "cake" rather than a "bread." Hence, this is sometimes called a "railway cake" sturdy enough to take the travails of travel.

This loaf is particularly good lightly toasted and spread with cream cheese. It’s really quite easy to make. British counterparts would call for dried currants. I settled for American dried sweet cranberries. I steeped both the berries and raisins in a cup of boiling water to plump them up. I drained them in a sieve and then rolled them on a cloth towel to dry as much as possible. (Some people would use a hot, strong cup of leftover tea. I've done that, but it really does not impart any flavor.) Don't omit the caraway. (If you can find them, use baking raisins which are already plump and juicy).

One could, of course, free-form the loaf into a rustic sphere or boule and bake in the oven. Or one could, I guess, use loaf pans. I have done neither.


Just about any dried fruit would work here. I've also
used golden raisins.

  • 1/2 cup white sugar
  • 1 1/2 - 2 cups raisins, (not recommended) or a combination of raisins and dried cranberries and other dried fruits (highly recommended) that includes dried cherries and if possible, dried citron
  • 4 cups all-purpose flour
  • 1 tablespoon caraway seeds
  • 2 1/2 teaspoons baking powder
  • 2 eggs, lightly beaten
  • 1 teaspoon baking soda
  • 1 1/4 cups buttermilk
  • 3/4 teaspoon salt
  • 1 cup sour cream
  • Fresh grated orange peel from 1/2 orange (optional but highly recommended)

Before making the bread, preheat oven to 350 degrees F. Grease a 9-inch round cast iron skillet or a 9-inch high-sided round baking or cake pan. I  use an 8 x 11 cast-iron, enamel-lined Dutch oven


Have your pan well greased and ready to go. As soon
as you add the buttermilk, the batter will begin to rise
and you don't want it sitting around.


In a large mixing bowl, combine flour (reserving 1 tablespoon), sugar, baking powder, baking soda, salt, raisins and caraway seeds. In a small bowl, blend eggs, buttermilk and sour cream. Stir the liquid mixture into the flour mixture just until the flour is moistened. Knead dough in bowl about 10 to 12 strokes. Dough will be very wet and sticky. Place the dough in the prepared skillet or pan and pat down with moist hands. Cut a 4-inch long x 3/4-inch deep slit or incision in the top of the bread. Dust with reserved flour.

For this batch, I grated in some orange peel
from half an orange I had in the fridge.

The batter will be very thick. 

Bake in the preheated oven for 60-75 minutes or until it reaches an internal temperature of 200 F. This is a wet dough, hence the long baking time. Let cool a bit and turn bread onto a wire rack to cool.


This was delicious and is a perfect breakfast
with a hot cup of tea or coffee.


TIP: Dried fruits are readily available around Christmas. I suggest you buy extra to store for recipes such as this. 


Orange Date Squares with Orange Icing


So, you're standing in line for your morning coffee and the decision-making begins: what to have with it . . . Something sweet? Healthy? Low calorie? These orange date squares have you covered on all 3 fronts. With only 1/3 cup butter and less than one cup of sugar, they are a justifiable choice. Their sweetness and heartiness comes from the dates and oranges. The orange icing is simple.


Derived from an old recipe, I added the spices. Next time, I may add even more. And I may just soak those dates with a shot of cognac or whiskey thrown in. I suspect these would make great muffins--spread with cream cheese! This had a nice rise and the texture is somewhere between a scone and cake.


  • 2/3 cup granulated white sugar
  • 1 1/2 cups pitted dates cut in medium-sized pieces (about 8-9 ounces)
  • 1/3 cup soft butter (not margarine)
  • 2 eggs
  • 2 cups sifted all-purpose flour
  • 1/2 teaspoon baking soda
  • 1/2 teaspoon baking powder
  • 1 teaspoon salt
  • 1/2 cup chopped pecans (I used walnuts)
  • 1/2 cup orange juice
  • Grated zest from two oranges
  • Optional:
  • 1/4 teaspoon (scant) ground cloves 
  • 1/4 teaspoon ground allspice
  • 1/2 teaspoon cinnamon


Pour the boiling water over the dates and let stand for 20-30 minutes, mixing occasionally.   The water will eventually be absorbed making an unctuous, creamy mixture.


Cream the butter and then add the sugar a little at a time until nice and fluffy. Add eggs and orange rind and beat for 2 minutes. You will see a change in texture. Then add the juice and mix only until well blended. (When you add the juice, the mixture will curdle and most of the juice will settle to the bottom. It won't affect the taste or texture of the cake.)

A microplane makes easy work of zesting citrus. Remember
to zest first before squeezing the juice from the orange.


Add the sifted dry ingredients, a small amount at a time, to the batter. Then add the nuts and dates alternatively and mix only until well-blended. Pour into a greased and floured 8 x 8 x 2-inch pan. Bake 1 hour in a 350 F oven (mine was done in about 40-45 minutes). Let stand on a cake cooler 10 minutes then invert and allow to cool. Frost with Orange Icing.


Orange Icing
  • 1 tablespoon melted butter
  • 2 tablespoons orange juice
  • 1 1/4 cups sifted confectioners' sugar


Add enough sugar, a small amount at a time, to butter and juice to form a medium consistency. Beat until smooth.


Thursday, March 10, 2011

Easy-Peasy, Split-Pea Soup with Bacon and Rosemary


No, you don't need a ham bone to make pea soup. Not even ham hocks. The bit of rosemary in this light and savory soup adds just the right touch. I usually half this recipe but add a bit more bacon and then a bit more for garnish. If you like things a bit more spicy, use pepper bacon.
  • 6 slices bacon cut into 1-inch pieces
  • 1 small onion, chopped ( sometimes I use shallots)
  • 1 leek, white and light-green part only, thinly sliced
  • 1 large carrot, chopped
  • 2 cloves garlic, minced
  • 4, 10.5 ounce cans chicken stock or homemade
  • 1 1/2 cups dried, green split peas, gone over and washed
  • 2 bay leaves
  • 1 teaspoon fresh rosemary, chopped
Cook bacon in a large pot until crisp. Stir in onion, leek, carrot and cook until soft. Add garlic and stir just until fragrant, about one minute. Pour in chicken stock. Stir in dried peas, bay leaves and rosemary. Simmer until peas are tender, about one hour, stirring occasionally. Now. How easy was that???


NOTE: Leeks usually come bunched in two's or three's. You only use the white part for cooking. But don't throw away the green leaves. They store for quite a while in the veggie crisper or you can rough chop them and freeze them. Yesterday I poached some chicken breasts and added the green parts of the leek to the water. You can also use them when making chicken stock. 

Slice the white part of the leek down the center and check for dirt which often hides in the crevices. You may need to wash/rinse it first.


Sunday, March 6, 2011

Kitchen Tips: Unique Food Pictures and Ideas

As I surf the Internet researching recipes and reading other food blogs, I sometimes come across interesting perspectives. From time-to-time, I will post them. Enjoy!


How cool are these little cupcakes? Large strawberries were cut in half and meticulously scooped out. A bit of vodka was placed inside and then lit. Be sure to blow out the strawberry before eating!


Why spend money on one of those upside down chicken roasters. Just use your bundt pan!  Put veggies of your choice in the bottom and let the juices cook them. 


Silicone cups make easy work of poaching an egg! They look like lotus flowers!

After a hard day of cooking and standing, let someone else do the clean-up. Ease into your favorite slippers and relax!


Friday, March 4, 2011

Cheese-Bacon-Dill Biscuits

Savory muffins great for breakfast or with a bowl of chili!


I've been playing around these muffins for a couple of years now. Sometimes I add less flour. Sometimes more. Less cheese. More cheese. And then around my fourth or fifth muffin I stop myself and say, "Damn, these are pretty good."

I suppose one could add ground ham instead of bacon and they'd be just fine. Even chopped onion. They're quite versatile. I often add whatever cheese I have in the fridge or a combination. For this batch I used an extra sharp cheddar. For my next batch I'll use part pepper jack. 

These are really best the next day. When they are cool, I put them in a large Ziplock back.  To serve, I nuke them until warm. A toaster oven would be great, too. Don't attempt to make 12 or they will come out more like biscuits than muffins. For the mere sake of visual appeal, I made 12 here.

Never walk away from the stove when making bacon.
And be sure to make an extra piece for yourself.

  • 3/4 -1, 8oz. brick extra-sharp cheddar cheese, grated
  • 6 slices bacon, cooked crisp and then crumbled (1/2 cup)
  • 1 cup unsifted flour, or a bit less
  • 2 and 1/2 teaspoons baking powder
  • 1/4 teaspoon salt
  • 1 tablespoon sugar
  • 1/4 teaspoon smoked paprika (optional)
  • 1 teaspoon dried dill, crushed a bit
  • 1 teaspoon onion powder
  • 1 egg
  • 3/4 cup milk
  • 2 tablespoons bacon grease (add oil if needed)

Cut up bacon and fry until brown and fat has been rendered. Remove from pan to drain, saving bacon grease. Grease 12 muffin cups. Do not attempt to use paper liners. They will not peel away from the muffin.


I finally threw out my old muffin tins and invested
in something a bit sturdier. Paper muffin liners
will not work with this recipe.


Coarsely grate the cheese. 

In a medium bowl, blend the flour, baking powder, salt, sugar, onion powder and dried dill. Add the grated cheese and toss with two forks until cheese is coated.  Add the crumbled bacon.


In a small bowl, mix the egg and milk. Add the bacon grease. Add to dried ingredients and mix until flour is incorporated. 

Divide batter into ten muffin tins. Bake in a 400-degree oven for about 15-20 minutes or until the tops just begin to brown and you can see the cheese melting. Remove from tin to a cooling rack and sprinkle with a bit more dill if desired. 


Fill ten cups, not twelve. I filled an even dozen
for "aesthetic" purposes only. If you insist on 12,
bake for less time.


These are especially good a day later. I store them in a large Ziplock bag in the refrigerator and microwave them for about 15 seconds. These are great for "a quick breakfast." I usually fill only 10 cups so they raise higher. If your cheese is unusually sharp, use abut 3/4 of the brick.


Tuesday, March 1, 2011

Meatloaf--with Frosting!

Sometimes I think the only reason I make meatloaf
is for the sandwich . . . 

Making a meatloaf is an endeavor into which one should not enter lightly. It is much like making a cake and requires much measuring and chopping and adding and mixing. In other words, it has a lot of steps. And it will take time. Plan ahead!

Meatloaf is to Americans what sausages are to Europeans! America is all about BIG! A meatloaf, baked in a standard 9"x 5" pan is an over-the-hill huge, gigantic sausage! But, Europeans know how to season ground beef and pork.

For Europeans, the "art" of sausages is all about the spices and herbs. One seeks a perfect blend and balance so that no single flavor is overpowering. Nor do you want a meatloaf/sausage that is dry and dense. Like my Mother, I used to bake my meatloaf it in a glass loaf dish so it basted in its own fat and juices. But, no longer. I now cook it free-form and, unlike my Mother, I baste it with "frosting" during the entire baking process.

Now. About that frosting . . . When I lived in Michigan I had a friend who loved my meatloaf. She was having guests who had children and a "meatloaf contest" ensued with the children as the ultimate judges. Long story short, this recipe won because, as she said, "It had that frosting!" By frosting, she meant sauce. Since then, I, too, refer to it as "frosting." And, why not? As I've said, making a meatloaf is kind of like making a cake, so why not frost it? You may, of course, omit the frosting; but I've never had anyone who didn't like it.

I don't like a "crunchy" meatloaf nor do I appreciate one littered with orange confetti from carrots. Green bell peppers can be overpowering. I do no use them.

A food processor makes quick work of finely dicing the veggies. Just make sure it is a "fine dice" and not "mush."


To the "frosting," I add a bit of heat ...  to taste ... and then brush it all over the meatloaf ... If serving to children, you may want to omit the heat.


  Several times during the baking time ... I brush on more to create a kind of "crust." Fantastic!

  • 1 lb. ground chuck or sirloin
  • 1 lb ground pork
  • 1/2 cup FRESH bread crumbs, not dried*
  • 1/4 cup oatmeal
  • 1 small onion, roughly chopped (about 4 oz.)
  • 1-2 celery stalks, roughly chopped (about 3 oz.)
  • 3/4 - 1 cup loosely packed, curly parsley leaves
  • 2 garlic cloves, peeled and smashed
  • 1/4 teaspoon dried thyme flakes
  • 1/4 teaspoon caraway seeds, slightly crushed in a mortar and pestle (don't omit)
  • 1 1/2  teaspoons dried mustard
  • 1/8 teaspoon allspice or just a few shakes (don't omit)
  • 1 teaspoon salt or to taste
  • 1/2 teaspoon pepper or to taste
  • 1 tablespoon horseradish, blotted of liquid on a paper towel (don't omit)
  • A handful of grated Parmesan cheese, canned is fine (optional with reservations)
  • 1/4 cup ketchup
  • 1-2 teaspoons Worcestershire sauce
  • 2 eggs yolks, slightly beaten
  • FROSTING
  • 1/2 cup ketchup
  • 1/4 cup packed, dark brown sugar
  • 1/2 teaspoon dried mustard
  • cider vinegar
  • Hot sauce of your choice (I used to use A.1. Sweet Chili Garlic Sauce, but it is no longer available. A good sub is Thai Sweet Chili Sauce). Use your favorite ... or maybe just a bit of Tabasco Sauce to taste.

Place a few pieces of torn bread into the food processor and pulse until you have light, airy bread crumbs.( Freeze what you don't use.)

Chop the following in the food processor until a fine dice is achieved: onion, celery, parsley and garlic.


Place the ground chuck and pork into a large bowl. Add the breadcrumbs, oatmeal, thyme, crushed caraway, ketchup, allspice, salt and pepper, dried mustard, horseradish and, if using, the cheese, and chopped vegetables. Using the flat end of a table knife, begin to incorporate ingredients being careful not to "squeeze" the mixture together. Remove a good teaspoon of the mixture and place on a plate. Microwave for about 15 seconds. Taste for seasonings and re-season as necessary.


Mix the egg yolks with the Worcestershire and add to meat mixture. Continue to mix until thoroughly incorporated. Place mixture in a large glass or tin loaf pan and carefully pat into shape. Unmold onto an aluminum-lined cookie sheet.

In a small bowl, mix together the 1/2 cup ketchup, brown sugar, dried mustard and a bit of cider vinegar.  Taste. If too sweet (it will depend on your ketchup) add a bit of cider vinegar. Now add the hot sauce. You just want a bit of a "kick." Brush most over meatloaf reserving the rest to baste the loaf during cooking.

Bake in a 350 F degree oven for about one hour or just a bit more until it reaches a temperature of 160 degrees. During that time, baste several times. Remove. DO NOT CUT. Allow to rest at least 20 minutes.


Cold meatloaf slices thin and beautifully.

* Place several pieces of cheap white bread in a mini-processor/blender. Or a left-over roll or biscuit. Pulse lightly just until crumbly. If you do not have a mini processor, tear or cut or crumble into tiny pieces no larger than a kernel of corn.