Index

Friday, December 30, 2011

Savory Palmiers


"Palmier" (pal-mee-ay) is French for little palm leaf, the shape they resemble.


These may look complicated, but they are ridiculously easy to prepare. As an hors d'oeuvre, they're amazing if only because of their beautiful appearance. And the fillings are endless. For this, I chose the classic palmier: pesto/parmesan/prociutto. A bit on the salty side, but perfect with cocktails! Next time, I'll keep it simple and go with goat cheese and garlic. You don't have to be a fancy pants--Velveeta and some deli ham will work just as well.

The key to making these is to keep the puff pastry cold. As soon as it begins to warm, it becomes sticky and difficult to handle. Other than that, these are a snap to prepare. 

  • 1 sheet puff pastry (I used Pepperidge Farm)
  • 2 oz. softened cream cheese
  • 2 oz. jarred pesto
  • 1/4 cup shredded Parmesan
  • 3-6 slices paper-thin slices prosciutto* (or other fine deli ham)

Mix cream cheese and pesto together. 

Lightly flour your counter and unwrap your pastry sheet. If necessary, lightly roll to form a perfect square--about 10 x 10 inches. Evenly spread with cheese/pesto mixture. Sprinkle with Parmesan and carefully lay the ham slices on top:


Begin rolling at one end until you come to the middle. Then begin rolling at other end. You now have two coils joined in the middle. Squeeze/roll a bit to form a roll. At this point, wrap in cling wrap and place in freezer for about 20 minutes to firm the dough.

Preheat oven to 400 F. degrees. Line a baking sheet with parchment paper.

Remove log from freezer and with a very sharp knife, slice into about 3/8-inch slices--larger than 1/4-inch and not bigger than 1/2-inch.


Place on baking sheet and bake for 15-20 minutes until golden, rotating pan after first ten minutes.


Allow to cool just a bit and serve while warm and flaky.

(I debated to post this recipe because I found it overly salty. But, then, I'm not a huge fan of pesto and I should have known better with the Parm. which is very salty. And with cocktails, the saltiness may be a plus. In the final analysis, I figured this recipe was more about technique and presentation than taste.)


*I think prosciutto is over-rated and way over-priced. You could just as easily use any type of deli ham and I wish I would have.


Wednesday, December 28, 2011

Sausage-Stuffed Chicken Legs with White Sauce

A de-boned chicken leg is stuffed with sausage
and served with a cheesy Bechamel sauce and onions.

Beef prices are atrociously high. Chicken legs are a few 
bucks a pack. Sausages are usually inexpensive,
or purchase when they are on sale! 


De-boning a chicken leg is really quite simple. Having a sharp knife is essential even though you do more "scraping and pulling" than actual cutting. Stuffing it is even more fun. For this recipe, I simply used Italian sausage, but you could use a bread or apple stuffing as well. Soon, I'll try a potato stuffing. The first time I made this, I had some bottled Alfredo sauce on hand, which I used instead of the Bechamel sauce. You can go that route. Or you can add a bit of stock to the pan before baking to give you some gravy juices. I've done that, too. I prefer the Bechamel. It's really not difficult to make and the taste and texture beats anything you can get in a jar.

Look for large drumsticks. Processors simply cut through the bone that joins it to the thigh. That's unfortunate since you won't get a flap of skin on the underside which makes for a neat fold.


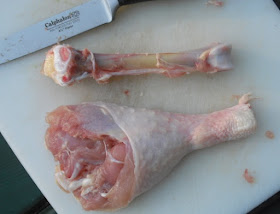
1. Wash and dry your drumsticks. Begin by cutting/scraping around the top to loosen it from the bone and joint. This is the most "complicated" part of the task. 


2. Holding your knife at an angle, scrape downwards or,  using your fingers, begin pulling the meat downwards. It will release pretty easily:


3. Grab the "ball" of meat and simply pull. You may need to make a small cut or two at the base to release it from the base of the bone:


4. Now simply turn the inside-out drumstick right-side in. Below is the completed, boneless leg, backside and front.


STUFFED CHICKEN LEGS  (Serves 2)

  • 4 plump chicken legs, de-boned
  • 2 Italian sausage links (I used Johnsonville mild)
  • 1 yellow onion, sliced
  • Poultry seasoning (I use Bells)
  • Olive oil

SAUCE:

  • 3 tablespoons butter
  • 3 tablespoons all-purpose flour
  • 2 tablespoons finely minced onion or shallot
  • 1/2 teaspoon finely minced or pressed garlic
  • 1/2 cup chicken stock
  • 1/2 cup whole milk
  • Nutmeg
  • 1/4 cup freshly grated cheese, such as Parmesan or Gruyere


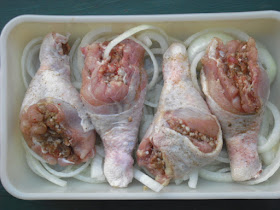
Remove sausage from casings. Divide into 4-5 parts and stuff it into each chicken leg being sure to fill the "handle" of the drumstick. Also be sure to push the meat of the leg back into place as you go.

Sprinkle with poultry seasoning.


Notice the leg in the lower right-hand corner. It still had some skin from the thigh so I was able to neatly fold it over. 

Pull skin over legs and shape and plump to make them look nice. 

Slice an onion into rings and place in the bottom of a baking dish/pan. Drizzle with a bit of olive oil and toss to coat. Neatly arrange stuffed chicken legs on top, meat side up.

Looking at these, one would never guess they are boneless.

Bake at 375 F degrees for 15 minutes. This will firm the stuffing. Remove from oven and turn skin-side up. Melt a bit of butter on each leg and return to oven. Raise temperature to 425 and bake for another 20 minutes, basting once with pan juices.

Remove and allow to cool while preparing the sauce:

In a small saucepan, melt the butter. Add the onions and cook until soft (I had some mushrooms on hand, so I added them, too). When soft, add the garlic and swirl until fragrant. Add the flour. It will turn into a paste. Cook for several minutes while stirring constantly. Begin adding the liquid a little at a time and whisking to avoid lumps until liquid is used and sauce has thickened. Remove from heat. Add several grates of fresh nutmeg. Stir. Stir in cheese until melted. Taste for seasoning. If sauce thickens too much before serving, just add a bit more liquid.

To serve: place a few spoonfuls of sauce on plate followed by some of the onions and then a stuffed chicken leg.


NOTES: Never add liquid to a glass baking dish that is hot. It will shatter. Add liquid before placing it in the oven. If desired, cut away the tendons from chicken leg. 

I think it would be interesting to replace the bone with a mozzarella stick wrapped in ham or proscuitto. I used just a splash of brandy on the legs when I put them in the oven.


Monday, December 19, 2011

Mushroom Lasagna


Earthy mushrooms sauteed in brandy and then layered between ribbons of pasta, a garlicky bechamel sauce, and three cheeses. Oh, my! 

I scaled this recipe to fit  a 10 x 7 dish, so it's perfect for a few people. As a first course to, say, a roast-beef dinner, it would be gorgeous. 

Lasagnas require many steps, so have everything measured, sliced and diced, and ready to go. I really wanted a smoked mozzarella but my market didn't have it so I settled for fresh. You may forego the mozzarella and simply add Gruyere if you wish. The Parm. keeps the recipe light but "cheesy." And don't skip the brandy. I think it makes the dish. For extra flavor, I add chicken stock to the bechamel.

I buy a pre-packaged variety of mushrooms at my market that include crimini, shitake and oyster and then I add baby bellas. Always soak your "no-cook" pasta in hot water before using. I love Barilla sheets which are flat. I don't get frilly-edged pasta at all.


  • 12 ounces mixed mushrooms, sliced and chopped
  • 3 shallots, chopped (a good 1/2 cup), divided
  • 2-4 tablespoons brandy
  • 1.5 cloves of garlic, pressed or minced
  • 1 cup fresh-grated Parmasan/Reggiano cheese
  • 1/2 cup grated Gruyere
  • Mozzarella, preferably smoked, 1/2 of a fresh round or shredded
  • 1/4 cup unsalted butter
  • 1/4 cup all-purpose flour
  • 1 cup whole milk
  • 1 cup low-sodium chicken stock
  • 1/4 teaspoon fresh-grated nutmeg
  • salt and pepper
  • 8 no-cook lasagna noodles (I use Barilla)*
  • Olive oil and butter for frying mushrooms


Shallots make all the difference!

Add some olive oil and butter to a large pan. When melted, add 1/4 cup of the chopped shallots and cook until translucent. Add sliced and chopped mushrooms and cook over medium heat until they release juices, about 10 minutes. Add brandy and continue to cook until liquid is re-absorbed into mushrooms and the mixture becomes "syrupy." Add a bit of salt and pepper. Set aside.


Fill a pan with hot tap water and submerge your no-cook pasta sheets as you prepare the sauce. (A bread pan works great.)

In a medium saucepan, add the 1/4 cup butter. When melted, add the remaining 1/4 cup shallots and cook just until translucent and soft. Add the pressed garlic and just stir to combine for a bit. Now add the 1/4 cup flour. The mixture will thicken immediately. Lower heat a bit and continuously stir the paste to cook the flour just until it gets a bit "nutty." Be careful not to burn the garlic or shallots. Begin adding the milk a little at a time, working away any lumps and keeping the mixture moving at all times. Whisk in the chicken stock and continue stirring. Add a dozen grates or so of fresh nutmeg. Stir. Remove from heat and blend in 1/2 cup Gruyere cheese. Taste for seasonings and re-adjust as needed. Set aside.

If your sauce is too thick, don't be afraid to add more liquid.
It should easily coat the back of a spoon when done.


Remove pasta sheets to drain. Lightly spritz/butter a 10 x 7 x 2 casserole dish. You will make four layers of pasta. Cut sheets to fit the dish. Preheat oven to 350 F. degrees.

  1. Smear a thin layer of sauce on the bottom of the dish. Place one layer of pasta without overlapping. Cover with some sauce. Sprinkle on 1/3 of the mushrooms and then sprinkle with 1/3 of grated Parm.
  2. Place down layer 2 of pasta. Spread with some sauce and then another third of mushrooms and 1/3 third of Parm.
  3. Place down layer 3 of pasta, spread with sauce and remaining mushrooms, but this time top with your Mozzarella.
  4. Place down layer four of pasta. Spread with rest of sauce and top with remaining 1/3 grated Parm. (I added a bit more).
Go easy on the cheese. Keep things light.

Cover lasagna with foil and bake for about 30 minutes. Remove foil and raise temperature to 500. Bake just until the top begins to brown a bit and lasagna is bubbly. Keep an eye on it. Allow to rest for a good 20-30 minutes before slicing.

By the time mine was done, I had lost the natural light:


*Barilla no-cook flat lasagna sheets measure 3.5 x 6.5 inches. It's important to always soak no-cook sheets in water first. I used half of a box, 8 sheets, about 4.5 ounces


Wednesday, December 14, 2011

Fried Potato Pancakes (Latkes)

Simple. Basic. Classic.


Whenever my grandmother babysat, we were guaranteed two foods: potato pancakes (latkes) and dumplings (Kreplach). To this day, nothing instills greater excitement in my family than the promise of those two foods. Our tongues literally quiver in anticipation. As Catholics, potato pancakes were a given on Friday, the day of no meat. They were certainly economical, but time-consuming in their preparation. My mother labored with a mountain of potatoes to grate.

I deviate from my mother's and grandmother's recipe in three ways: I drain the potatoes after shredding which allows them to cook quicker and crisper and less mushy in the center. I fry them in peanut oil. My mother and grandmother got out the can of Crisco and melted great mounds of the white stuff. I've also used olive oil, but peanut oil can withstand high temperatures without burning and smoking. I also now use two grates: one small and one large with is more visually appealing and which gives a really great "crunch" to the outer edges.

Wonderfully crunchy on the outside, warm and soft on the inside. Kids love them.

Sorry, but a blender of food processor just doesn't cut it when grating potatoes for latkes. It's a labor of love and best done by hand. The small holes on a box grater are too small and will result in a mush. You want about five grating holes to an inch. Yes, you should measure.

My mother and grandmother used this simple grater for potato pancakes. I wish I would saved either or both when they passed because I recently purchased one and the poor quality tells me it won't last very long!
Through the years, I have accumulated a number of graters just for this recipe. I like my latkes crunchy on the outside and perimeter, but a bit softer in the middle. For those who are thinking these are nothing more than a smashed tater tot or McDonald's hash brown, move on. Not even close!

But, it you and your family loves authentic has browns, this recipe is for y'all!

With a salad and a side of fruit, these can be a meal in themselves. Traditionally, they are served with sour cream or applesauce. They go well with any wine, but I still prefer a tall, cold glass of milk. They also pair with smoked sausages or leftover ham. Smoked salmon is over the top! I just love them with butter and salt. My mother loved them with cottage cheese.

These are great for an appetizer. Also good when you need some kind of a vegan dish. Just  fry in any type of animal fat or oil that has a high smoking point.

Historically, they should be fried in chicken fat, but it is insanely expensive to buy, let alone find.

Notice the crispy, crunchy edges as a result of using two sizes of grating.

As a young teacher, these saved the day for dinner. They were less expensive than pancakes which I often made (with hot dogs). Potatoes were cheaper than flour. And, yes, back then I used shortening for frying. Butter and salt were cheaper than syrup. A tall glass of cold milk and I was filled and happy ready to grade a mountain of students' papers . . .
 Makes about 14-16 pancakes
  • 1.5 - 2 lbs. Idaho potatoes, peeled
  • 1/2 of a small onion, about 4-6 oz. leave root end intact
  • 1.5 tablespoons all-purpose flour or, if you have it, potato flour
  • 1 large egg, sightly beaten
  • 1+ teaspoon Kosher salt
  • A few shakes all-purpose black pepper
  • Peanut oil for frying. Chicken fat (schmaltz) is even better. Or duck fat.


Preheat oven to 200 degrees F. (warm) and line a baking sheet with foil. Place a wire rack over the baking sheet.

Add peanut oil to a heavy frying pan (I use a cast-iron pan) at least 1/4 inch in depth. The oil does not need to cover the potatoes when frying. Turn heat to medium to begin to heat it up and keep an eye on it.

Cut potatoes into fourths so they are easier to fit into your hand while shredding. Shred five of the quarters on a medium-fine grate. Grate the remaining three on the large holes of a box grater. Grate the onion on the large holes of the box grater (keeping the root end intact prevents the onion from coming apart while grating it).

This grater has five holes to the inch. Note how they are elongated.
 Perfect.

Transfer potato mixture into a seive and jiggle out most, but not all, of the potato juice, pressing down a bit. Save the juice and allow it to rest.

Beautifully "shredded" and not at all mushy.

Allow the juice to rest.

Carefully pour off the liquid which will reveal
the potato starch that has settled to the bottom.


Place drained mixture into a bowl and add the slightly beaten egg, flour, salt and pepper. 

Gently drain the potato liquid being careful to leave behind the white potato starch which will have settled to the bottom. Add starch to potato mixture and mix through.


Raise heat on oil and when shimmering, add forkful of potato mixture forming in a round and pressing down a bit--just to shape. Do not overcrowd the pan. When edges begin to turn brown, flip and fry other side. DO NOT WALK AWAY from frying the pancakes. They can burn suddenly and easily. You will have to adjust heat as you fry.

Never walk away from the pan. Do not crowd the pan. Adjust heat as
necessary. The heavier the pan, the better.
I prefer my cast iron frying pan.

When golden brown, remove to drain and then place on a rack over a baking sheet in oven to keep warm while preparing subsequent batches.

Serve with butter, sour cream, apples sauce, cottage cheese, salt and pepper. 

If you've never had these, congratulations. You're now an addict!


Friday, December 2, 2011

Baked Chicken with Sausages, Apples & Onions

A great autumn blend of flavors!

When I tell people I'm making apples with onions, they turn up their nose, "Ewwww!" They don't know what they're missing. In fact, it has been one of the consistent top, all-time recipes for Kitchen Bounty.


At first, I just made this recipe with chicken, apples and onions. And it was great, but I wanted something a bit more. Pairing chicken with sausages is nothing new in Europe. And I just happened to have some sweet Italian sausage on hand, so I added a few links. It made the dish. Sometimes I serve with a simple side of noodles or savory stuffing. Either way, this is sure to be a favorite from your kitchen. And the only noses turned up will those inhaling the wonderful aroma as this bakes.


  • 1 large yellow onion peeled and sliced for a final weight of 8 oz.
  • 2 sweet apples, cored, unpeeled, and sliced for a final weight of 8 oz.
  • 4 bone-in chicken thighs (or two leg quarters), skin on
  • 2 Italian sweet sausages, cut in half
  • 1/2 teaspoon whole fennel seed
  • 3-4 sprigs fresh thyme (or several pinches dried thyme flakes)
  • 2 tablespoons chicken broth
  • 1 tablespoon Cognac
  • 1 tablespoon butter, cut into fourths
  • Poultry seasoning (I use Bell's*) Buy Bells
  • Old Bay Seasoning
  • Salt and pepper


Preheat oven to 400 F degrees.

Rinse and pat dry the chicken. Remove any extra fat or skin, if desired. Season the underside well with poultry seasoning a bit of salt and pepper. Sometimes thighs have a "hinge" of skin which I like to fold over the seasoned meat. Turn over and sprinkle tops with Old Bays. Set aside.


Slice the peeled onion into thick 1/4-inch slices and then cut the slices in half. 

Core, but do not peel the apples. Cut in half, And then cut each half into thirds. You want the slices to be a bit on the thick side. For this recipe, I used one Gala and one Golden Delicious. 


Heat just a bit of olive oil and butter in a pan. Add the onions and cook just until they begin to show color. Add just a bit of salt. It's not necessary to cook them all the way through. Add the fennel seed and apples. Stir and cook just until apples begin to take on a bit of color.


Evenly spread apple/onion mixture in a 10 x 7 dish. Add the one tablespoon of Cognac to the hot pan to deglaze and add two tablespoons of chicken stock and just a bit of butter. Simmer for a minute or two and then drizzle the mixture evenly over the apples and onions. Scatter thyme springs on top.


Place chicken thighs on top of apple mixture and tuck in sausages.


Bake, uncovered, for 25-30 minutes. Remove from oven and skim one piece of the quartered butter over each thigh. Turn over the sausages. Return to oven for another 15 - 20 minutes, removing once to baste chicken with the juices and bake until golden brown.


Remove from oven and allow to sit a good 20 minutes or so to allow juices to settle and absorb. Serve each thigh with one sausage and a spoonful of apple/onion mixture.

Serves 2-4.

UPDATE: You can also add green cabbage to your apple and onion mixture.

NOTES: I used Johnsonville Sweet Italian sausage. I placed several julienned strips of smoked pork jowl over each thigh before baking, but I realize that is something many people may not have access to. If desired, fry two strips of bacon until crisp. Remove from pan and fry your onions in the bacon fat along with just a bit of olive oil. Crumble the bacon over the apple/onion mixture before you add the chicken. 

A note on liquor. If you're like me, you don't have a variety of "hard liquor" on hand. I buy the tiny  4 oz/50 ml bottles of liquors that I use most for cooking. They are inexpensive and handy to have. Grand Marnier, Cognac, Brandy, Rum, and Amaretto are the ones I use most.

*Bells Seasoning is a blend of rosemary, oregano, sage, ginger, marjoram, thyme and pepper. I love it. You can find it at: www.brady-ent.com